
Introduction
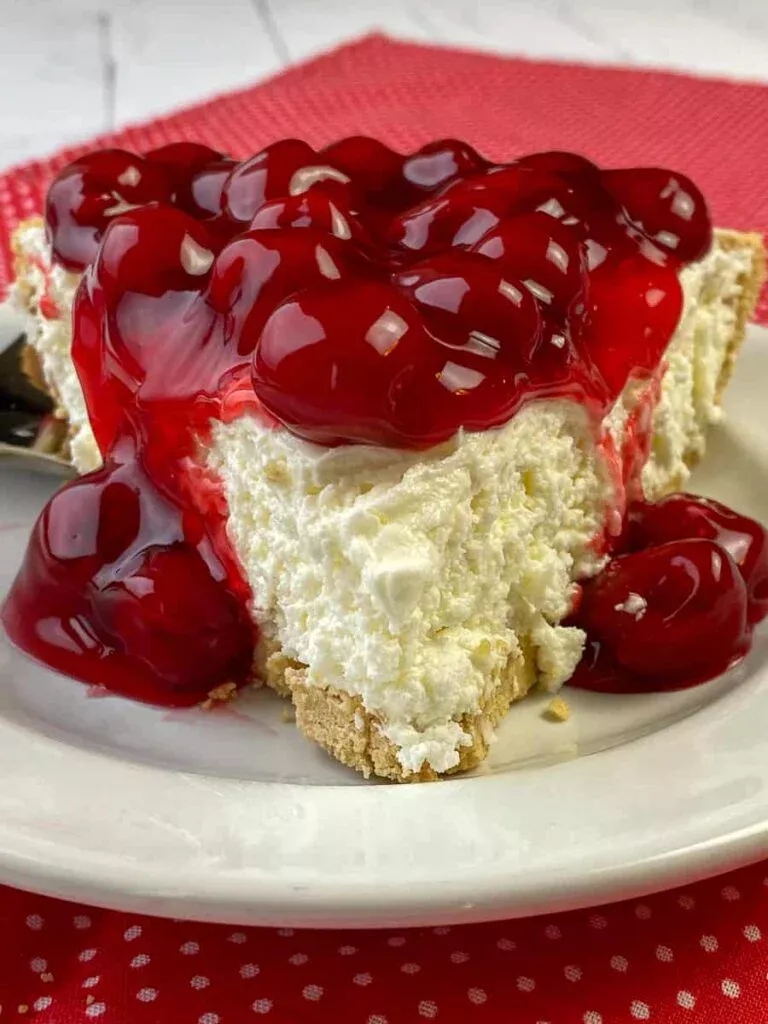
This no-bake cherry cheesecake is a classic, ultra-creamy dessert that comes together without turning on the oven. It delivers a silky smooth filling, a buttery cookie crust, and a generous layer of sweet cherry topping. Perfect for busy days, special occasions, or effortless entertaining, this cheesecake is simple yet impressive.
Why You’ll Love This Recipe
- No baking required, making it ideal for warm days or quick preparation.
- Creamy, smooth texture thanks to the whipped cream and softened cream cheese.
- Easy, beginner-friendly recipe with minimal equipment needed.
- Versatile topping options: canned cherry filling or a homemade cherry compote.
- Customizable crust using Graham crackers, petits-beurres, or Digestive biscuits.
- Sets beautifully in the refrigerator for clean, professional-looking slices.
- Perfect for holidays, potlucks, birthdays, or make-ahead entertaining.
Ingredients
For the Crust
- 200 g Graham crackers or petits-beurres, finely crushed
- 80 g melted butter
- 1 tablespoon sugar (optional)
For the Cream Filling
- 450 g cream cheese (Philadelphia), at room temperature
- 100 g sugar
- 1 teaspoon vanilla extract
- 200 ml heavy cream, very cold (35% fat)
- 1 tablespoon lemon juice (optional, for brightness)
For the Cherry Topping
- 1 can cherry pie filling
or - 300 g fresh or frozen cherries
- 2 tablespoons sugar
- 1 teaspoon cornstarch, diluted in a little water (for homemade topping)
Directions
Step 1: Prepare the Crust
- Mix the crumbs – Combine the crushed biscuits, melted butter, and sugar (if using) in a bowl until the texture resembles wet sand.
- Press into the pan – Pour the mixture into a 20–22 cm springform pan.
- Compact the base – Press firmly using the back of a spoon or a flat-bottomed glass to form an even crust.
- Refrigerate – Chill for 15–20 minutes until firm.
Step 2: Make the Cream Filling
- Beat the cream cheese – In a large bowl, beat the cream cheese, sugar, and vanilla until smooth and lump-free.
- Whip the cream – In a separate bowl, whip the cold heavy cream to stiff peaks.
- Fold together – Gently fold the whipped cream into the cream cheese mixture using upward motions to maintain the airy texture.
- Add lemon juice – Stir in the lemon juice if you prefer a hint of acidity.
Step 3: Assemble the Cheesecake
- Add the filling – Spread the cream mixture evenly over the chilled crust.
- Smooth the surface – Use an offset spatula to create a clean, even top.
- Chill thoroughly – Refrigerate for at least 4 hours; overnight chilling gives the best firmness and flavor.
Step 4: Add the Cherry Topping
- For canned filling – Spread the cherry pie filling over the cheesecake just before serving.
- For homemade topping – Heat cherries with sugar and a splash of water. Add diluted cornstarch and cook until thickened. Cool completely before spreading.
Tips for Best Results
- Use full-fat cream cheese for the creamiest texture and best stability.
- Make sure the cream cheese is at room temperature to avoid lumps.
- Whip the cream until very firm; under-whipped cream can make the cheesecake too soft.
- Refrigerate the cheesecake overnight for a perfectly set, sliceable result.
- A springform pan ensures clean, easy unmolding.
- If using homemade cherry topping, cool it fully before adding to prevent melting the filling.
Variations & Substitutions
- Gluten-free: Use gluten-free biscuits for the crust.
- Lemon cheesecake: Add 1–2 teaspoons of lemon zest and replace vanilla with lemon extract.
- Chocolate crust: Swap Graham crackers for crushed Oreos without the filling.
- Berry topping: Replace cherries with blueberries, strawberries, or raspberries.
- Light version: Substitute part of the cream cheese with Greek yogurt.
Serving Suggestions
- Serve chilled with extra fresh cherries or a drizzle of cherry syrup.
- Pair with coffee, tea, or a light sparkling drink.
- Perfect for birthday tables, family gatherings, summer barbecues, or holiday desserts.
- Slice with a hot knife for clean, restaurant-quality presentation.
Storage & Reheating
- Refrigerator: Store covered in the fridge for up to 4 days.
- Freezer: Freeze (without topping) for up to 2 months. Thaw in the refrigerator overnight before adding the topping.
- Reheating: Not applicable, as this is a no-bake dessert. Serve chilled.
Nutrition Information
Per Serving (about 140g):
- Calories: 390 kcal
- Carbohydrates: 32g
- Protein: 5g
- Total Fat: 27g
- Saturated Fat: 15g
- Polyunsaturated Fat: 2g
- Monounsaturated Fat: 8g
- Trans Fat: 0g
- Cholesterol: 75mg
- Sodium: 260mg
- Potassium: 130mg
- Fiber: 1g
- Sugar: 25g
- Vitamin A: 810 IU
- Vitamin C: 2mg
- Calcium: 90mg
- Iron: 0.8mg
Nutritional values are approximate and may vary depending on specific brands and quantities used.
FAQ
Can I make this cheesecake ahead of time?
Yes. It’s actually better when prepared a day in advance because it sets firmer and tastes richer.
Can I use low-fat cream cheese?
You can, but the texture will be softer and less stable. Full-fat cream cheese is recommended.
Can I replace the cherry topping with something else?
Absolutely. Any fruit compote, jam, or pie filling works well, including blueberry, raspberry, or mixed berries.
Why is my cheesecake too soft?
It may be under-chilled or the whipped cream may not have been firm enough. Be sure to whip to stiff peaks and chill at least 4 hours.
Can I use a regular cake pan instead of a springform pan?
If lined properly with parchment, yes—but removing clean slices will be more difficult.